FCS Race
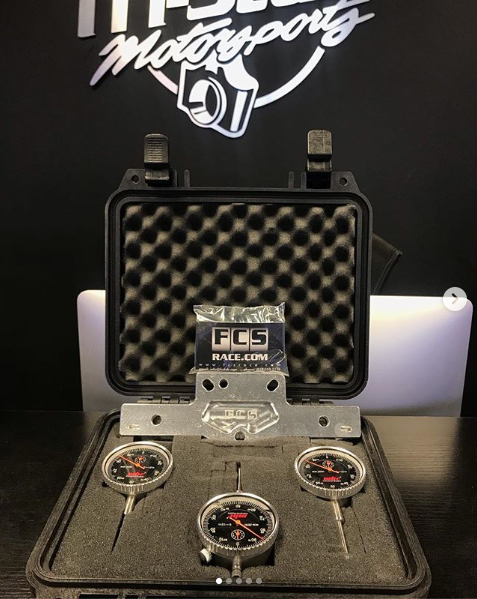
FCS Race - Honda OHC Cam Degree Kit
FCS Race - Honda OHC Cam Degree Kit
SKU:FCS-OHC-CDK
Category: Cam GearsCouldn't load pickup availability
This kit contains everything needed for camshaft degreeing specific honda motors when the cylinder head is ON the engine, including our instructional web link that demonstrates proper cam degreeing techniques.
Our kit is manufactured for Honda specific "all in one" OHC engines for B,H,K, and F series engines. quick and easy setup to accurately measure valve-to-valve and valve-to-piston clearances in your high performance engines.
Kit Includes the Following:
1- Signature 9" Web Camshafts Precision degree wheel
1- Honda specific "All-in-One" dial indicator CNC billet mount plate ( B, H, K, F series compatible)
3- precision dial indicators in black face and fluorescent Orange needles for low light visibility
3- pc stainless extension rod set
1- stainless bolt hardware kit
1- Impact resistant, shock proof and waterproof 1200 series Pelican insulated carrying case
2- ball bearing lockers for vtec rockers.
2- conical stainless steel soft springs to check for clearances
1- Cam Degreeing Instructions located here :
WHAT IS DEGREEING IN YOUR CAMSHAFT?
Degreeing in your camshaft means synchronizing the camshaft's position with the crankshaft. A few degrees of misalignment can affect the engine's operation dramatically. If there were no manufacturing tolerances, you would only need to line up the marks on the timing chain sprockets and the cam would be degreed, but with a group of components (the camshaft, crankshaft, timing chain, and sprockets) all with their own standards and tolerances that when installed, can stack up against you. You can never be sure that the cam is in its correct position until you degree it in. For best performance, you should degree in all performance camshafts.
The basic tools required are a degree wheel, a stable pointer that can be mounted to the engine, a dial indicator with at least one inch of travel in .001" increments, a stand that mounts it to the engine, and a positive stop device to locate TDC.
Web-Cam offers a complete cam degreeing kit, see below for part number information or call for more information.
If you change your timing belt or chain, chain tensioner, cut your head, or deck your block, you must degree in your cams.
FINDING TRUE TOP DEAD CENTER ( TDC )
DISCONNECT THE BATTERY! Do not use the starter to perform any of these steps.
To find Top Dead Center use a piston stop, to stop the piston in the same position on either side of TDC and take readings from the degree wheel. You will then split the difference in these readings and move the pointer this amount, making it the true TDC point.
First mount the degree wheel on the end of the crankshaft, and rotate the engine to approximate TDC
Mount the pointer and line it up at zero on the degree wheel.
Now rotate the engine to move the piston down into the cylinder. Install your positive stop device into the spark plug hole and extend the bolt.
Turn the engine by hand, rotating it until the piston comes up and stops against the piston stop bolt.
Look at the degree wheel and write down the number of degrees shown by the pointer.
Turn the engine by hand in the opposite direction until the piston comes up and stops on the piston stop bolt again.
Go back to the degree wheel and write down the degrees it now reads.
Add these two readings together and divide the answer by two.
Now either move your pointer by this many degrees, or carefully loosen the degree wheel (without disturbing the position of the crankshaft) and move the wheel this required amount.
Retighten the bolts, and rotate the engine again making sure that the readings on each side of TDC are equal degrees away from zero. If they are, the zero on the degree wheel will now be the true TDC point.
Remove the positive stop device from the spark plug hole.
You're now done finding true TDC.
FINDING INTAKE LOBE CENTER LINE
Remove all valve lash (clearance). Place your dial indicator on the valve spring retainer, or tappet. If you are degreeing in a pushrod engine we recommend placing the indicator on the valve retainer. Please be sure the angle of your indicator travels at the same angle that your valve travels. Zero the dial indicator, then turn the engine until you reach full lift and record how far the valve traveled off its fully seated position. This will be the actual valve lift of your desired cam profile. Note: Rocker arm engines can vary. At this point make sure there is additional clearance with your dial indicator to verify plenty of travel for our next step.
Rotate the engine until you are back to Top Dead Center (TDC). Zero your dial indicator. Next you will start turning the engine until you are .050 off the seated position of the valve (It is very important to turn the engine it’s normal way of rotation). Look at the degree wheel and determine how many degrees the valve opened. If we are working on the intake valve this will normally occur Before Top Dead Center (BTDC). Record that number in degrees. NOTE: Some low overlap engines may open After Top Dead Center (ATDC). Record that number in degrees for further calculations.
Look at your inner dial on the dial indicator and record that number to help achieve our next step, however some dial indicators do not have this feature and is not needed to proceed. See WEB CAM camshaft degree kit part #95-144. Proceed to rotate the engine until your inner dial is back on the number it left from. You will notice your big dial is almost back to .050. Slightly move it until it is exactly reads at .050. If you pass it back way up and come at it again. You are now .050 from closing on the opposite side to achieve your next number on the degree wheel, which is normally After Bottom Dead center (ABDC). Now you will use the following steps to properly calculate what actual lobe centers are on the opening valve timing events.
If the valve opened Before Top Dead Center (BTDC) do the following calculation:
Take the open number plus the closing number plus 180°, which will be the duration at .050. Next divide the duration into 2. Subtract the open from that number, which will equals the centerline of the intake cam.
Example:
+10° Opening Before Top Dead Center (BTDC)
+39° Closing After Bottom Dead Center (ABDC)
+180° Distance from Top Dead Center (TDC) to Bottom Dead Center (BDC)
=229° Total Duration @ .050 inches of lift
229°/2 = 114.5°
114.5° - 10° = 104.5° Lobe Center
If the valve opened After Top Dead Center (ATDC) subtract the open from the close plus 180°, which will be your duration at .050. Next divide the duration into 2. Add back the open number, which will equal the centerline of the intake side.
Example:
-10° Opening After Top Dead Center (ATDC)
+39° Closing After Bottom Dead Center (ABDC)
+180° Distance from Top Dead Center (TDC) to Bottom Dead Center (BDC)
=209° Total Duration @ .050 inches of lift
209°/2 = 104.5°
104.5° +10° = 114.5° Lobe Center
If you have adjustable gears move them at this time and redo above procedure.
FINDING EXHAUST LOBE CENTER LINE
Next step is to set up your dial indicator and repeat the above procedure. The exhaust valve normally opens Before Bottom Dead Center (BBDC), and the closing will occur After Top Dead Center (ATDC). On some low overlap cam profiles the exhaust valve may close Before Top Dead Center (BTDC) however, record for further calculations. Once you have achieved your opening and closing events we can precede to the following calculations.
If the exhaust closed After Top Dead Center (ATDC) add the exhaust opening figure to the exhaust closing figure plus 180°, which will equal the duration at .050. Divide the duration by 2. Subtract the closing number, which will equal the centerline of the exhaust side.
Example:
+39° Opening Before Bottom Dead Center (BBDC)
+10° Closing After Top Dead Center (ATDC)
+180° Distance from Bottom Dead Center (BDC) to Top Dead Center (TDC)
=229° Total Duration @ .050 inches of lift
229°/2 = 114.5°
114.5° - 10° = 104.5° Lobe Center
If the exhaust closed Before Top Dead Center (BTDC) subtract the exhaust closing from the opening figure plus 180°, which will equal the duration at .050. Divide the duration by 2. Add back the closing number, which will equal the centerline of the exhaust side.
Example:
+39° Opening Before Bottom Dead Center (BBDC)
-10° Closing Before Top Dead Center (BTDC)
+180° Distance from Bottom Dead Center (BDC) to Top Dead Center (TDC)
=209° Total Duration @ .050 inches of lift
209°/2 = 104.5°
104.5° + 10° = 114.5° Lobe Center
If you have adjustable gears move them at this time and redo above procedure.
ALWAYS CHECK SEVERAL TIMES FOR ACCURACY
CALCULATE LOBE CENTER SEPARATION
Add your intake lobe center line to the exhaust lobe center line, and divide by 2.
( 108° + 110° ) / 2 = 109°
ADJUSTING LOBE CENTER SEPARATION
You may move the cam to the desired lobe center and check again. If you move the lobe centers closer together ( Smaller Number ), it would normally give you more low to mid range. If you move the lobe centers apart ( Larger Number ), it would normally give you more mid to top range. Not all engines can handle tight lobe centers. Certain applications require wider lobe centers, such as stock fuel injected engines or blown applications. For our best recommendation, please call us directly.
CHECKING CLEARANCES
Always check all clearances (i.e. piston to valve, valve to valve), check for coil bind, and check retainer to guide clearance when you degree in your cams.
Shipping & Delivery
Shipping & Delivery
We can ship to virtually any address in the world. Note that there are restrictions on some products, and some products cannot be shipped to international destinations. For international orders, please Contact Us. If you select US shipping rates and are shipping internationally, please be advised you will be contacted to compensate the difference in shipping fees.
Processing takes about 3 to 5 business days before your order ships. We do not process or ship orders on weekends. If you order an item that's on backorder, we will reach out with an estimated arrival time. If you have any questions about shipping make sure to email us at sales@onlinetsm.com or call our reps today at 732-
Insurance
Insurance
What is Route and Green Package Protection?
Route's Green Package Protection is a package projection solution that helps you cover your order in the event that your order gets lost, stolen, or damaged while in transit while also protecting the planet. We know it is frustrating to have something happen to your order, so we've partnered with Route to offer added assurance that you're supported, no matter what. Green Package Protection can be added during checkout.
Every time you add Green Package Protection to your order, Route donates to support an agroforestry initiative that removes CO2 from the air and promotes a flourshing ecosystem.
You can also utilize the Route App to visually track all of your online orders in one place and easily file a claim with their team. Whether you're tracking via the Route App or online, Route's real-time shipping updates keep you in the loop throughout every part of your delivery. Haven't downloaded the app yet? Download here.
Purchased Route's Green Package Protection and looking to file a shipping issue online? File Here.
How Does Route Work?
If your Route-protected order ends up lost, damaged, or stolen, Route's expert support team helps ensure that your order gets replaced or refunded as preferred. Claims will be reviewed for approval within 1-2 business days form filing.
Need to file a claim? File Here.
How Does Route Process Refunds or Reorders?
Refunds: When refunding an item, Route covers the subtotal, shipping, and taxes.
In both cases, the Route Premium cost will not be refunded.
Reorders: Route will reorder the items, depending on in-stock availability. Unavailable items will be refunded. Route will cover the cost of any reorders including shipping, taxes, and Route Shipping Protection.
When Should I File a Claim?
Stolen (or any package that has been marked as delivered but your customer cannot locate)
- Your customers have up to 30 days from when the package was marked as delivered to file a claim. Claims will not be approved before 5 days after the package has been marked as delivered giving the carrier time to "actually" drop off the package or for neighbors to return it in the case that it was delivered to the wrong address.
Stuck in Transit (Lost)
- Your customers have up to 30 days to file a claim.
- Domestic packages are not considered lost until after the 7th day without a tracking update.
- International packages are not considered lost until after the 20th day without a tracking update.
Damaged
- Your customers have up to 30 days to file a claim after the package has been marked as delivered.
- For damage claims, we do require photo evidence of damage so we can verify that the product was actually damaged.
All of Route's policies are listed here.
What if My Order Never Arrives, Is Stolen, or Arrives Damaged?
Route definitely helps cover these instances!
To protect your order against loss, theft, or damage add Green Package Protection at checkout.
If your order has not arrived, please file a claim with Route here. For damaged orders, please take photos of the item and the packaging it arrived in to include in your claim when filing.
If your order has defects or you suspect it was damaged during manufacturing, please reach out to use and we will be happy to work with you to remedy the situation.
How Do I File a Claim for my Lost, Damaged, or Stolen Order?
If you insured your order with Route at checkout, you will receive a confirmation email from Route with a link to file a shipping issue.
You can also file a shipping issue on Route's app or via the web here. To file a claim, you will need your store order number OR Route ID number and the email address that was attached to the order.
Haven't downloaded the app yet? Download here.
What are Route's Terms and Conditions?
Route's terms and conditions are listed here.
Is Route a Licensed Insurance Company?
Yes, Route is a licensed insurance company with SEG Insurance Ltd. as its partner.
FAQs
FAQs
When will my product ship out?
Processing takes about 3 to 5 days before your order ships. Some orders may take longer than usual to process and ship. If you order an item that's on backorder, we will reach out with an estimated arrival time. Refunds are subject to a 20% restocking fee. Cancellations are subject to 10% cancellation/processing fee under no exceptions.
What's the Warranty on our products?
Unless the product is manufactured by Tri-State Motorsports or TSM Race, ALL Warranties go through the Manufacturer directly. Please visit their official website and get in contact with them in regards to your warranty. We will supply you with any invoice or tracking information the manufacturer asks you for. We also offer Route Protection shipping insurance.
Do you offer any promotions?
One of our major promotions is the TSM Bucks Loyalty Program. You will earn 1 TSM point for every dollar you spend with us. These points can be redeemed for rewards when you reach certain thresholds.
If you subscribe to marketing emails, you will be given a discount code for 5% off your order that you can use at any time. Our Instagram page also has a variety of weekly promotions in our stories and posts. Some restrictions may apply depending on MAP policies.
What payment methods are accepted?
Tri-State Motorsports accepts American Express, Discover, Mastercard, and Visa. You can also pay over time with Affirm and Klarna. Express checkout methods include:
- Apple Pay
- Google Pay
- Meta Pay
- PayPal
- Shop Pay
- Venmo
How can I finance my purchase with Affirm?
How can I finance my purchase with Klarna?